
Introduction:
In the world of web development, creating a seamless and user-friendly subscription form is a common task. In this short blog post, we’ll explore a JavaScript code snippet that allows you to integrate a subscription form with Mailchimp using JSONP for cross-origin communication. JSONP is particularly useful when working with third-party APIs that might not support CORS (Cross-Origin Resource Sharing). Mailchimp offers a robust platform for managing email campaigns, and integrating an embedded form into your website can be a powerful way to collect and manage subscriber data. Let’s dive into the code and understand how it works.
Form setup in MailChimp
Log in to Your Mailchimp Account Firstly, log in to your Mailchimp account. If you don’t have one, you can sign up for free on the Mailchimp website.
Navigate to the Audience Dashboard Once logged in, go to the Audience dashboard. If you haven’t created an audience yet, you’ll need to set one up to start collecting subscribers.
Create or Select an Audience If you don’t have an audience, follow the prompts to create a new one. If you have an existing audience, click on it to access the Audience settings.
Access the Signup Forms Within your selected audience, locate the “Audience dashboard” and navigate to “Manage Audience” then “Signup forms.”
Choose Embedded Forms In the Signup Forms section, you’ll find various options. Select “Embedded forms.”

Customize Your Embedded Form (Optional) Mailchimp provides customization options for your embedded form. You can choose the form type, form options, and set up fields as per your requirements. Customize the appearance to match your website’s design. Or the other option is to just use the endpoint from the form and create our own. Which I will do now.
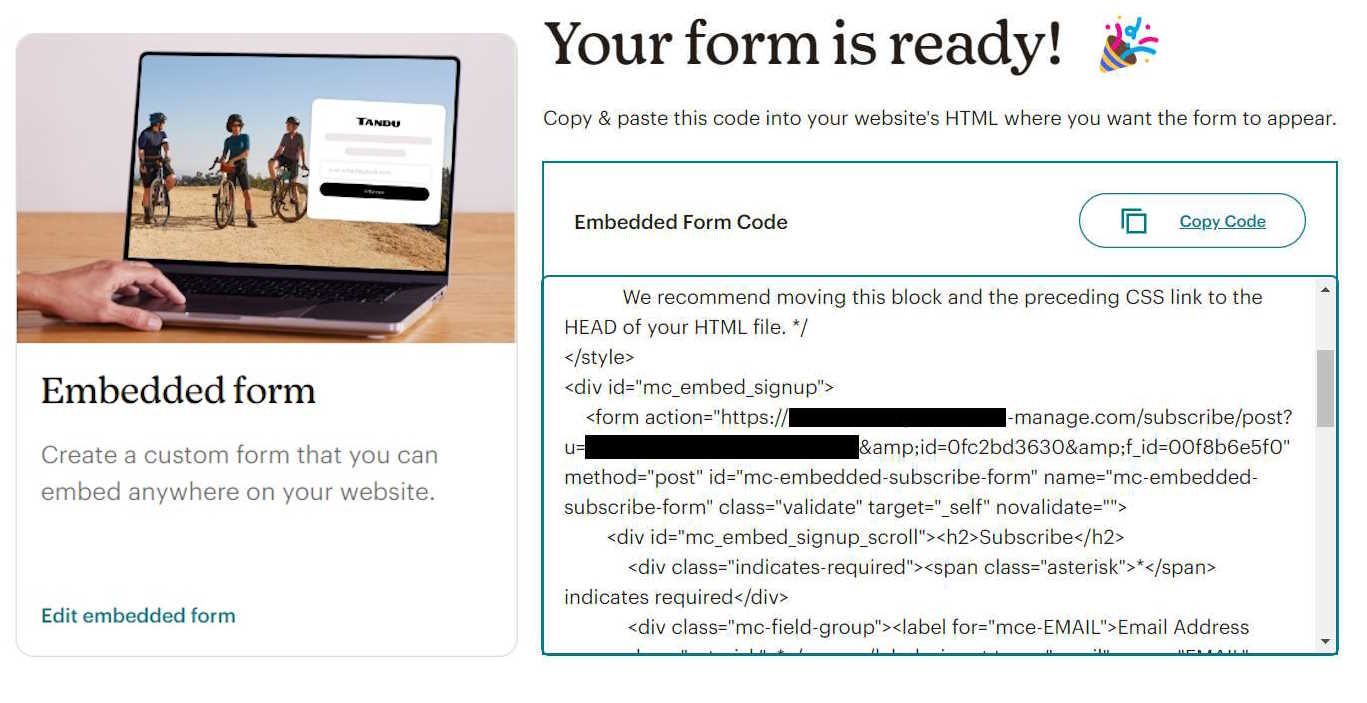
Generate the Embed Code Once you’ve customized your form, scroll down to the “Copy/paste onto your site” section. Here, you’ll find the HTML code for your embedded form. we need the url after the action and the number after the u= .
Form setup on the webpage
We will just use a standard html form for the submission you can style this any way you like
<form
  id="mc-embedded-subscribe-form"
  name="mc-embedded-subscribe-form"
  class="validate"
>
  <div id="mc_embed_signup_scroll">
    <h2>Subscribe</h2>
    <div class="indicates-required">
      <span class="asterisk">*</span> indicates required
    </div>
    <div class="mc-field-group">
      <label for="mce-EMAIL"
        >Email Address <span class="asterisk">*</span></label
      >
      <input
        type="email"
        name="EMAIL"
        class="required email"
        id="mce-EMAIL"
        required=""
        value=""
      />
      <span id="mce-EMAIL-HELPERTEXT" class="helper_text"></span>
    </div>
    <div id="mce-responses" class="clear foot">
      <div
        class="response"
        id="mce-error-response"
        style="display: none;"
      ></div>
      <div
        class="response"
        id="mce-success-response"
        style="display: none;"
      ></div>
    </div>
    <div aria-hidden="true" style="position: absolute; left: -5000px;">
      <input
        type="text"
        name="b_faf118b7ec5be23b94e4c9fc0_0fc2bd3630"
        tabindex="-1"
        value=""
      />
    </div>
    <div class="optionalParent">
      <div class="clear foot">
        <input
          type="submit"
          id="mc-embedded-subscribe"
          class="button"
          value="Subscribe"
        />
        <p style="margin: 0px auto;">
          <a
            href="http://eepurl.com/iBlWMM"
            title="Mailchimp - email marketing made easy and fun"
          >
            <span
              style="display: inline-block; background-color: transparent; border-radius: 4px;"
            >
              <img
                class="refferal_badge"
                src="https://digitalasset.intuit.com/render/content/dam/intuit/mc-fe/en_us/images/intuit-mc-rewards-text-dark.svg"
                alt="Intuit Mailchimp"
                style="width: 220px; height: 40px; display: flex; padding: 2px 0px; justify-content: center; align-items: center;"
              />
            </span>
          </a>
        </p>
      </div>
    </div>
  </div>
</form>
Form submission
We will just use a standard html form for the submission you can style this any way you like
<script type="text/javascript">
document.addEventListener("DOMContentLoaded", function () {
    const form = document.getElementById("mc-embedded-subscribe-form");

    form.addEventListener("submit", function (e) {
        e.preventDefault(); // Prevent the default form submission

        // Serialize form data to a query string
        const formData = new FormData(form);
        const serializedData = new URLSearchParams(formData).toString();

        // Define the JSONP callback function name
        const callbackName = "handleMailchimpResponse";

        // Define the JSONP URL with callback parameter
        const jsonpUrl =
            "https://barefootrecipe.us10.list-manage.com/subscribe/post-json?u=faf118b7ec5be23b94e4c9fc0&id=0fc2bd3630&" +
            serializedData +
            "&c=" +
            callbackName;

        // Create a script element for JSONP
        const script = document.createElement("script");
        script.src = jsonpUrl;

        // Define the JSONP callback function
        window[callbackName] = function (response) {
            // Handle the JSONP response as needed
            if (response.result === "success") {
                console.log("Form submitted successfully.");
                // You can redirect or display a success message here
            } else {
                console.error("Form submission failed.");
                // Handle errors here
            }

            // Clean up by removing the script element and callback function
            document.body.removeChild(script);
            delete window[callbackName];
        };

        // Append the script element to the document to initiate the JSONP request
        document.body.appendChild(script);
    });
});
</script>
Conclusion
By integrating this JavaScript code snippet into your website, you can enhance the functionality of your Mailchimp subscription form. This approach allows you to communicate with Mailchimp’s API seamlessly, providing users with a smooth and reliable subscription experience. As always, remember to customize the code to suit your specific requirements and error-handling preferences. Happy coding!